Version 1.0 is released with MMBase 1.6.
This software is OSI Certified Open Source Software. OSI Certified is a certification mark of the Open Source Initiative.
The license (Mozilla version 1.0) can be read at the MMBase site. See http://www.mmbase.org/license
The editwizards allow designers to easily create wizard-like web-entry forms for content entry and maintenance.
The wizards are not intended to edit all possible relations and fields of an object; they are more suitable for special content tasks, such as editing a news item or adding a user to the system and placing images and organizational information along with it. A wizard with more than 3 steps is generally over the top.
In this document you will learn how to install the editwizards on your MMBase release, and how to create your own wizards. First the basics are explained, and how the most simple wizards should be set up. Then, you'll see how more complex wizards can be created.
If you install and run an 1.6 or higher release of MMBase, the editwizards will be included.
To let the editwizards run properly, the /mmapps/editwizard directory must be in place (default installed). This directory contains the JSP pages, the wizards, images, XSL's and CSS stylesheets and client-side Javascript code - in shirt, all the fields needed to run the wizards.
For all practical purposes, you only need to remember the location of the fields wizard.jsp (which you call to edit a specific object or create a new one), and list.jsp (which you use to list objects which you can then select for edit).
You are free to move the /mmapps/editwizard directory somewhere else. If you do, you need to change the calls in the examples below so they point to the right directory.
The editwizards can be used by the following browsers:
Internet Explorer 5.0 and higher on Windows platforms
Internet Explorer 5.1 and higher on Apple Macintosh platforms
Netscape 6.1 and higher on any platform
Mozilla 0.9.6 and higher on any platform
You'll need a running instance of MMBase (as from version 1.6, the editwizards are included).
The examples below assume the right builders and relations are available for the demo's. If not, make sure the right builders are active. You can do this by deploying the 'MyNews' application (By the admin pages or by setting the autodeploy status of the MyNews.xml to true).
The editwizards rely heavily on XML and XSL. Therefore, this guide assumes you know something about xml nodes and attributes and how to make valid xml documents.
You also need a decent version of an xml parser. MMBase comes with xalan and xerces, which should suffice. If you are an administrator, note that the xalan/xerces jars that ship with orion are older versions. You will need to replace the orion jars with the ones that ship with the MMBase distribution.
To make sure the wizards are up and running, you can try the following:
Make sure your MMBase and webserver is up and running
Open a browser
The examples can be found in the 'mmexamples' subdirectory that is installed with the MMBase distribution. Type in the url to the editwizard examples, eg.: http://localhost:4242/mmexamples/editwizard/
A simple html file should show with a few online demo's
Click on the link to "A very simple example"
Click on the demo "Images"
A login screen should popup. Login as you would with the MMEditors or the MMBase admin.
If you logged in correctly, a list of images is shown (this can be an empty list).
Let's try to upload a new image. Click on the right-bottom plus-icon to upload a new image.
A wizard-form is shown. Enter a title of the image and its description. The 'title' and 'description' are required fields. Their prompts stay red until you enter something. Click on 'Upload new image'
Browse to an image, select it and click on 'upload'. The page with the image information will refresh, showing the newly uploaded image filename and size. (in Internet Explorer, the image itself can be previewed. In Netscape or Mozilla preview is not available)
By clicking on "Save" you store the image in MMBase. You return to the image list. The image you just uploaded is added to this list.
In this section we will make a simple wizard to learn the basics about the wizards. Let's try to build up a simple wizard.
First, you need to decide what your wizard should do. In our first example, we just want to let the user edit the plain fields of a very simple object. We use the builder: "people" to make our first wizard (this builder is present if you installed the MyNews application).
Users will be able to add, delete and change people-objects (persons in real-life) using this wizard. If you just want to see how it's done, see the working example in the editwizard installation.
We also need to decide where to put our wizards; for the purpose of the current example, we suggest to place them in the directory 'data' inside the mmapps/editwizard directory. This will enable us to directly call the wizards and use the examples (we will later see how you can place your wizard files somewhere else).
Let's say we make a new directory, named "practice" in the "data" directory. So, the path from the web-root looks as follows: mmapps/editwizard/data/practice
Create a text file in the subdir you decided, with the extension ".xml". In our example, it should be named: /practice/simple.xml . Open the newly created simple.xml in a text-editor and copy or type the following code into simple.xml. Save the simple.xml file.
<?xml version="1.0"?>
<wizard-schema id="some_id">
	<!-- give the wizard a title -->
	<title>Practice</title>

	<!-- define an action to create a people object -->
	<action type="create">
	 <object type="people" />
	</action>

	<!-- define an action to delete a people object -->
	<action type="delete" />

	<!-- define an form to edit a people object -->
	<form-schema id="step1">
		<!-- form title -->
		<title>People Wizard</title>

		<!-- edit field 'firstname' -->
		<field name="firstname">
			<prompt>First name</prompt>
		</field>

		<!-- edit field 'lastname' -->
		<field name="lastname">
			<prompt>Last name</prompt>
		</field>

	</form-schema>
</wizard-schema>
Check if your newly created wizard works.
Open your webbrowser and type in the url to the editwizards list.jsp page, as follows (replace with the correct domain name if your site does not run at localhost:4242) :
http://localhost:4242/mmapps/editwizard/list.jsp?wizard=practice/simple&nodepath=people&fields=firstname
The list.jsp page is one of two pages you can call to start the wizards. List.jsp reads the xml you provide as the 'wizard' parameter, and creates a list of items to pick from - either to edit or to delete. It may also provide a button with which you can add new people.
You should see a login screen first. Login as you would with the MMEditors or the MMBase admin. After you logged in, you're screen may look like this:
There is one person ('Rob') entered in the list example above (this may be different in your case). It has a delete button (the minus-sign) with which you can remove the person. Clicking on the name 'Rob' will allow you to edit the person name. The 'plus' sign in the bottom-right screen allows you to add new people.
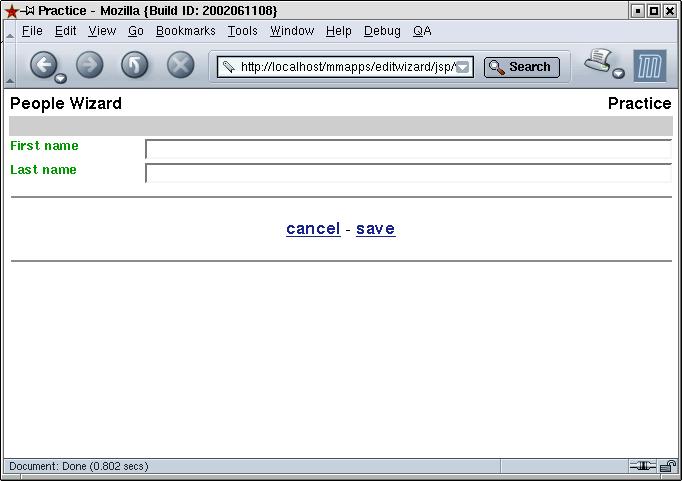
Let's create a new person. Click on the plus-icon. If you filled in the editwizard correctly, you should see the following page:
Here you can see your first wizard in action! Two fields are visible (as defined in the simple.xml file). Fill in the two fields and press save. You are returned to the list, which should now contain your newly added person.
You can image you can change the fieldnames, titles and object-types in the wizard so that you can edit different objects in the system. But wizards can do a lot more. We'll get to that in the following section.
You can already make and run a simple wizard. In this section, we go deeper into the features of the wizards. We will take the simple wizard from the practice example in the former section, and expand this simple example with new elements.
The create action defines whether, and more importantly, what should be created in MMBase if the user clicks on the create-button in the list view. A create action is placed inside the /wizard-schema node. You can create multiple objects inside each other (and create relations between them), and place default values in some fields. Example:
<action type="create" >
	<!-- create an object of type 'people' -->
	<object type="people" >
		<!-- initialize the firstname field to 'NOBODY'  -->
		<field name="firstname">NOBODY</field>

		<!-- add a relation to a newly created, empty news object  -->
		<relation role="related">
			<object type="news" />
		</relation>
	</object>
</action>
This action creates 2 objects and 1 relation. It first creates a new 'people' object, and fills the field "firstname" with the value "NOBODY". It then creates a new 'news' object, and relation with role 'related' between the two new objects.
The relation between people and news need be defined before MMBase will create it for you. As noted previously, the MyNews application defines all these relations for you once installed.
If you do not define a create action, the wizard does not allow you to create anything, and the list page will not show a create button.
Generally, the wizard needs to know what objects and relations to <load> before the wizard-pages are displayed. By default, it loads the MMBase object that was passed to it, and all its fields. But often we will want to edit more than one object at once. In that case, we need to also load these other objects. You can use the load-action to define the load behavior of the wizards, forcing it to load related objects so you can edit or display them along with the main object. Example:
<action type="load" >
	<!-- for the object passed, only load the firstname and lastname fields -->
	<field name="firstname"/>
	<field name="lastname"/>

	<!-- load all relations from this object to 'news' objects with role 'posrel' -->
	<relation role="posrel" destinationtype="news" >
		<object>
			<!-- only load the titel field of these news objects -->
			<field name="title"/>
		</object>
	</relation>
</action>
This load action loads only the firstname and lastname fields of the object passed (a person). It also loads all the news objects (but only the title field) that are related to this object.
Place a delete action in the wizard if you want to allow the users to delete objects. Try to remove the <action type="delete" /> from the practice wizard and reload the list to see what the impact is.
The delete buttons will disappear.
When you delete an object in the editwizards, all relations with other objects will also be deleted. It is not possible to automatically delete the objects related to, just the relations themselves.
You need to specify each field you like to edit in one of the form-schema's in a wizard. Every field has a format type that determines how the field can be edited. Fields can be edited using textboxes, text areas, dropdown lists, or using an upload button, all depending on the fields' format type.
By default, the wizard uses the format types (or guitype) as defined in the builders in MMBase. You can override these types with your own if you prefer another format. In the reference section you will find what field types you can use and what options they have.
An important element of the editwizards is the ability to do basic validation on the fields. You can add attributes to specify limits on what a field can contain. Eg.:
<field name="firstname"> ...
can be extended with validation fields. Because the "firstname" field is a text-field, you can apply text-validation rules, such as a minimum or maximum text length. Eg.:
<field name="firstname" dtminlength="1" dtmaxlength="20" > ...
The field is now only valid if it contain at least 1 and at most 20 characters. As long as the field is invalid, it will be marked red in the wizard, and you cannot save the object
The exact validation rules available are dependent on the field's datatype. The datatype is automatically determined by MMBase. Examples of datatypes are string, integer, and datetime. You can override the datatype to force certain constraints, but it is advised you stick to the types MMBase advises, unless you know what you are doing.
A quite important feature of the editwizard are the "lists". With lists, you can show, edit, delete and create objects related to the object you are working on.
For this example you'll need the people and the news objects in MMBase.
In the practice directory, create a new file named people.xml. Enter the following xml:
<wizard-schema id="people">
	<title>People</title>

	<!-- Action to create a new people object -->
	<action type="create">
		<object type="people">
			<field name="firstname">Enter firstname HERE</field>
		</object>
	</action>

	<!-- Action to delete a people object -->
	<action type="delete" />

	<!-- Action to load a people object, including all posrel relations to news  -->
	<action type="load">
		<relation destinationtype="news" role="posrel" />
	</action>

	<form-schema id="step1">
		<title>People</title>
		<!-- Show people object -->
		<field name="firstname" >
			<prompt>Firstname</prompt>
		</field>
		<field name="lastname">
			<prompt>Lastname</prompt>
		</field>

		<!-- List all news items related with role posrel
				 This list can have a minimum of 0 and a maximum of infinite ("*") items.
				 This is also the default for a list
		-->
		<list role="posrel" destination="news" minoccurs="0" maxoccurs="*">
			<title>Related newsitems</title>
			<!-- Show the 'item' in a list (the object) -->
			<item>
				<field name="title" ftype="data">
					<prompt>Newsitem</prompt>
					<description>Here you can see the name of the related newsitem</description>
				</field>
			</item>

			<!-- defines a search command.
					 This creates a search box that allows you to search for objects
					 using a specified nodepath.
					 In this case, the searchs ercahes for news items, using the fields
					 'title' and 'subtitle' to show the results of the search in the list.
			-->
			<command name="search" nodepath="news" fields="title,subtitle" age="-1">
				<prompt>Search newsitems</prompt>
				<!-- Search filters determine what you can search on (in this case, on title
						 or both title and subtitle)
						 If you do not specify a search filter, the default is to search on the
						 'title' field.
				-->
				<!-- Search on title -->
				<search-filter>
					<name>subtitle contains</name>
					<search-fields>subtitle</search-fields>
				</search-filter>
				<!-- Search on title and subtitle
						 not the notation in the search-fields for more than one field
				-->
				<search-filter>
					<name>title or subtitle contains</name>
					<search-fields>title|subtitle</search-fields>
				</search-filter>
			</command>
			<!-- Action to create a relation, used by the search command to create
					 the relation once it is found and chosen.
			-->
			<action type="create">
				<relation destinationtype="news" role="related" />
			</action>
		</list>
	</form-schema>
</wizard-schema>
Try the new wizard.
Open a browser and go to the wizards. Eg.: http://localhost:4242/mmapps/editwizard/jsp/list.jsp?fields=firstname&wizard=practice/people&nodepath=people
Login if needed
Now you should see a list with all people-objects available in the system. In our example, one user exists (Rob).
Let's create a new one. Click on the star-icon in the bottom-right of the window.
Now, you should see a wizard-form with your new people-object. By default, the firstname is filled with "Enter firstname HERE".
You can see that text in the entered wizard above.
Fill in your values and press Save. You should see the list again with your new people-object added.
To the list, edit the new people object, by clicking on its name.
Search for a newsitem to relate it to, by click on the search-icon in the square: "Related newsitems".
A popup should be visible now, with all newsitems available at this time. The MyNews application includes a few example items. If none are showing, you can add a new newsitem with the MMBase basic editors (/mmeditors/jsp/).
Click on a newsitem of your choice and press Ok. The wizard-form will reload and you should see the newly related newsitem in the square.
Press Save. The people object is edited; it is related to the newsitem of your choice. Open the people object again to verify.
This is part of the MMBase documentation.
For questions and remarks about this documentation mail to: [email protected]